Wednesday, December 30, 2009

A bit of bubbly....

Happy almost New Years everyone!
The decade is almost over, and I'm so thankful for whats happened in the past ten years. I graduated high school, started college, got a good paying/stable job, met the love of my life, got married and I'm now beginning my dreams of Cupcakes by Coley. It's going to be a lot of work, but in the next ten years I hope to have a running bakery, graduate college with my Masters Degree, watch my husband graduate from Art Center in Pasadena, start a family, and hopefully buy a house of our own.
To celebrate 2010, I decided to make "Champagne" Cupcakes.
This cupcake has a lot of "firsts" for me. The cupcake is a yellow cake, a new recipe I tried. I think it called for too much salt. I wrote a note in my new book, I got for Christmas (Thanks Aunt Debbie!) to cut back on the salt. It only asked for 1/4 teaspoon worth, but it was over powering for my taste.
The original recipe calls for the liqueur of my choice, such as Grand Marnier or Kahlua. I didn't put anything in it actually, I wanted to see how the cake tasted first. So the next time around I'll add a little something inside. =)
So not only was I dealing with a new recipe, but my 2nd "first" that I dealt with was to make a poured fondant glaze. Glaze? Didn't know that even existed until now. It was very easy to make, very hard to deal with, very messy-- so be sure to have something underneath your cupcake while drizzling this stuff on. It's sticky and gets everywhere. It also dries very quickly so you have to work fast. It's made of water, light corn syrup and lots of powdered sugar. (the glaze is very sweet!)
Then for another "first" I went out and bought tiny pearly dragees, which is a bead like sugar coated candy. Man oh man were these things tiny and hard to deal with. After my first cupcake, I went and grabbed tweezers to place them on the cupcake. Since the glaze stiffened up, the pearls wouldn't stick to the cupcake and they would just roll right off the darn things. I eventually got the hang of it, and went on about my business. I also used edible glitter for the first time. That stuff is expensive! It was about $4.19 for a little containers worth. It was a container that resembled what you might get eye shadow in. Very small, very expensive. Hehe my husband inst a fan of the glitter, kind of got all over the place and we have a running joke that it will be stuck to the floor for the next ten years or so =) Sorry hunny!
I think these cupcakes would be perfect for a New Years Eve Party, but because they were a lot of work I'm pricing them at $1.50 each rather then my standard $1.
Please contact (818)620-7535 to place an order.
Photography: Travis J. Premo

Hung with Care

I made this particular cupcake more of a "I have an idea" sort of thing. I made it well before Christmas, but I'm just now having the time to blog about it.
I tried to make this look like a traditional Christmas ornament. Its a fairly simple cupcake, white cupcake with a butter cream frosting. For the decorations (I just used whatever color I had that day) and piped on some simple designs. For the hanger, I used a mini Reese's peanut butter cup and my original idea for the hook was to be part of a pretzel. But it was my genius husband who suggested it to be a candy cane instead! Much more tasty! (More festive at least) I wish I could have decorated it a little better, but it really was a practice run, and it gets the point across.
Santa was very impressed =)
Photographer: Travis J. Premo

Tuesday, December 8, 2009

Peppermint Cupcake

My second cupcake of the night is a little fancier then the last. I figured I owed you a little something extra.
This cupcake is also a vanilla cupcake, but with a twist....with the suggestion of my hubby I crushed mini candy canes into the batter.
Without having a clue of how they would turn out, I'm pretty pleased with them. Travis thought they were pretty good. It made the cupcake gooey, with a slight crunch.
To decorate the cupcake, I frosted the top of it with a white butter cream, and piped the peppermint design in red butter cream frosting, with the help of Travy of course.
These are also available for my standard price. $1 each or $10 for a dozen.
Photography: Travis J. Premo

Seasons Greetings!

Tonight, this cupcake is no difficult task by any means. Just a simple cupcake meant for the simpler times in life.
This is your standard vanilla cupcake with a butter cream frosting piped on, with festive holiday sprinkles!
Available for purchase. $1 each or $10 for a dozen.
Please contact me for ordering: (818)620-7535. Cupcakes are made to order.
Photography: Travis J. Premo
Sunday, December 6, 2009

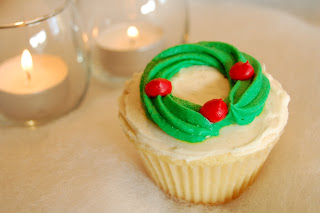
Christmas Wreath

Well I finally did it. The vanilla cupcake recipe finally worked for me. Thanks to a bigger and better oven. (Cupcakes by Coley should have never had to use an apartment oven, blah!)
I truly believe the cupcake came out better, because of the heat distribution. My husband said, "Much better baby!"
As I said this is a vanilla cupcake, with butter cream frosting. To get in the holiday spirit, I made them to look like holiday wreaths. I first frosted a layer of white butter cream for the base and then used a special tip to pipe on the wreath shape, and then a smaller tip to pipe on the red "holly berries" as I like to call them.
These are available for purchase for $1, or a dozen for $10. Please visit me at:
or
for more information.
WOW! How exciting! I had my first caller for Cupcakes by Coley, a woman called saying she found my website on Google and wanted to place an order for a dozen cupcakes, sadly she wanted them now, and there was no way I could have pulled that off, but I told her to keep me in mind for any future events. Didn't make any money off of it, but at least I know my advertisement is working and my name is starting to leak out into the world. =)
Photographer: Travis. J Premo

Thursday, December 3, 2009

Ho! Ho! Ho!

Well hello my fellow cupcake lovers! I'm so disappointed in myself that last night was my first time making cupcakes since my witches hats' in October! Most of the month of November was spent traveling for work and my husband's 25th birthday. In addition to traveling Travis and I moved back into the San Fernando Valley after a year of being in Santa Clarita. So last night I had enough of my cupcakes supplies to begin baking once again. What better time to get back on the wagon than the holidays. This next cupcake was inspired from a website I found. I made a few adjustments but the idea is still the same. The cupcake is my chocolate cake recipe, and the frosting is all butter cream. To decorate the cupcake, I first frosted the entire top with white butter cream frosting, then my loving hubby piped on Santa's hat in red butter cream. To make the beard look like it had texture I used shredded coconut, and to top off Santa's hat the puff ball is made up of a mini marshmallow. These cupcakes are now available for purchase at $1 a piece. It came out pretty good for a first run, I'm sure I'll be making them again to tweak it a little more. But this made me think of a whole line of cupcakes. So stay tuned for that. On the business side of things, Cupcakes by Coley now has an OFFICIAL website. Please visit me at www.CupcakesbyColey.com It is a work in progress but it's up and running and all mine! (Thank you Travy for such a wonderful suprise and putting the site up for me) Photography: Travis J. Premo

Tuesday, October 27, 2009

Witches Hat

As I said last night, I had thought up of two ideas for a Halloween cupcake, this would be the second idea.
This cupcake is very easy to make as you can see, but it would be super cute to make with your kids on Halloween.
This is a chocolate on chocolate cupcake, my mom's recipe of course, with a milk chocolate Hershey's Kiss in the center. Around the base of the kiss and around it, I decorated it with orange frosting to make it look like a bow attached to the witches hat.
I feel bad using the word "I" in this blog because my husband was right there with me the whole time, from beginning to end. He helped bake the cupcakes, make the frosting and he even had his hand on decorating. The bow is his handy work =)
This will be my last Halloween cupcake for the year. Who knows what ideas may pop up next time around. I'll be focusing on some sort of Thanksgiving cupcake and of course a special project for my husbands upcoming 25th birthday, November 17th. I love you Travis.
For ordering information please visit me on Facebook, Cupcakes By Coley.
Photography: Travis. J Premo

Monday, October 26, 2009

Perfect for a kids Halloween Party

Well I seem to be on a "seasonal kick" as far as ideas go. This past week I made Pumpkin Spice Cupcakes as you remember, which made me think what else can I make for the Halloween season?
Well I thought of two ideas, one of which I tried tonight. (The other I'll save for tomorrow)
One of my husbands all time snacks are, dirt cups. Yes, I'm talking about chocolate pudding, cool whip, oreos and gummy worms. Nothing extravagant, just a simple dessert that brings him back to being a kid. Ive made it several times for him, but I thought, "How can I make this into a cupcake??" The worms fit perfectly into the Halloween theme.
So what I did, was I used my moms chocolate cake recipe, and added oreos into the batter. I then made a standard vanilla butter cream and added cocoa. Top it off with some gummy worms and crushed oreos for decorations, and you have a pretty cute idea for a kids Halloween party at school or something.
It could even be used as buying the cupcakes, and having the kids frosting their own and decorating it with how they want. Kids love that sort of stuff during school parties.
$1 each or $10 for a dozen. 10% of all proceeds will go to Breast Cancer Research
Photography: Travis J. Premo

Sunday, October 25, 2009

Think Awareness

Tonights cupcake comes from an inspiration from the cookbook Ive been working from. Instead of silver candy balls I used sprinkles. This made them look more like my company logo =)
They are your classic vanilla cupcake with a confectioners sugar frosting with pink food coloring.
Since the vanilla cupcake is one Ive struggled with in the past, I was sure to cook them for less time. I baked them for 18 minutes instead of the usual twenty. They didnt brown ontop which I like. So I now know that the 18-19 minute mark is when they do start to brown ontop, and that is a no no in my world.
These cupcakes, as well with the others are now available for ordering. Since it's October and its Breast Cancer Awareness Month, I'm running a special. For the rest of the month 10% of all proceeds will go to Breast Cancer Research. (This of course is proceeds from all cupcakes, not just these.)
Photography: Travis J. Premo

My 50th Cupcake

So on Cupcakes by Coley's fan page via Facebook I asked my fans which recipe I should make for my 50th cupcake. The winner? Pumpkin, with a cream cheese frosting.
This particular one did not come from the cookbook. Why there wasn't a pumpkin recipe within the 500 cupcakes beats me. I personally think one of the nonfat or dairy free ones could have been replaced with pumpkin...
Anyway, the recipe was a huge success and turned out perfect. My husband and myself agreed that the texture was perfect and I did pretty well with the baking time.
The recipe has some great spices that made it come alive. For example, cinnamon, nutmeg, allspice and a few others that I wont go into great deal in case these turn up in my future bakery. =)
It said to bake for 20-25 minutes, and knowing my oven I baked for 20 with the suggestion of Travis. I cant wait to move out of this apartment. We'll be moving into my mother in-laws condo, she's letting us rent it out, which will be a huge help. The oven in that place in is twice as big, and a lot less shall I say...crappy.
These cupcakes are now available for ordering: $1 each or $10 for a dozen.
Please contact:
Coley at:
or visit my website:
Photography: Travis J. Premo

Tuesday, October 20, 2009

Are These Real?

"Are these real?" Travis asks. "What do you mean by real?" I respond. "Meaning they don't have any dates, they aren't gluten-free, they actually have fat in them..?" he adds. "haha yes, they are real"
My next challenge comes from page 167 in the cookbook, and they are actually muffins, not cupcakes, but its in the book-so I gotta do it.
These next ones are apple & cinnamon muffins. They were super easy to make. Flour, sugar....damn it as I type this blog I realize the next ingredient is baking powder and I forgot to add it into the mixture. Too late now, they are in the oven as we speak. grr! Anyway, the rest of the ingredients are cinnamon, vegetable oil, sweet butter (melted), eggs, buttermilk, and two apples, peeled, cored and finely diced.
Ugh, I hope they at least taste okay, I cant believe I forgot the baking powder. I'm sure most people probably wouldn't even blog about how they forgot, but this blog is all about learning experiences. Besides I have three other attempts to this recipe, I'm bound to get it right at least once, right?
5 minutes left on the timer...I'm anxious to get these suckers out of there.
Well, they look OK. Time will only tell.
So they've cooled down, and my husband and I sampled some...the verdict? Well they're very tasty but the texture is way off. The muffin kind of sticks to the inside of your mouth, after taste tastes like theres something missing. Which there is. Better luck next time.
Photography: Travis J. Premo

Number 48!

This is one of my favorite recipes, hands down.
My 48th cupcake does not come from the cookbook, but from my mommy. My mom has been making this killer chocolate on chocolate cake for years. A favorite of my brother and I, and my husband joined the band wagon a few years ago. It's moist and delicious and will for sure be in my future bakery. (Mommy will get a cut, of course!)
This recipe is so good, I wanted to try to make it into cupcake form. My first attempt went pretty well.
The recipe originally says it will make two 9-inch layer pans or a 13 x 9-inch pan. Which turned into two dozen cupcakes! yum yum!
The recipe goes on to say to bake for twenty minutes. Now since this was my first attempt, I didn't want to alter any temperatures or timing. So that's what I did. I baked at 350 degrees for twenty minutes.
They seemed delicious to me, but Travis suggested baking them a little less next time. So I'll take the suggestion and bake them for 18 minutes and see what happens.
For business reasons, I will not reveal the recipe, you'll have to buy them at my bakery one day. =) Just take my word, they are awesome.
Amanda, got to sample one for her birthday on Sunday. They were a day old at that point, but she got the idea.
Stay tuned! Number 49 is in the works! Hint: apple
Photography: Travis J. Premo

Monday, October 19, 2009

A cup of tea

Let me start off by saying, these next cupcakes I didn't actually bake tonight. I made them a couple of days ago but I haven't had the chance to blog about them until now.
This next cupcake comes from the fragrant & spiced section of the cookbook. They are called chai cupcakes. "Chai is a spiced Indian tea made with frothy warm milk." The cupcake was pretty light and have a spicy flavor.
This recipe calls for self rising flour, baking powder, salt, chai tea powder, sweet butter, brown sugar, egg whites, and buttermilk.
All the ingredients were easy except the chai tea powder. Go figure. After searching several markets, including Whole Foods I still couldn't find a powder version of the tea so I went for tea bags instead and cut them open to get to the spices. The recipe didn't call for that much to begin with. One tablespoon is all you'll need.
Bake for the usual 20 minutes at 350 degrees and you've got yourself a surprisingly good cupcake. When its cooled you top with a cream cheese frosting. I skipped this step for the soul propose of, I already know how to make that frosting, and didn't want to waste ingredients. Not to mention the author of the book portrays the cupcake without frosting, and so will I. I think it may taste weird with it, but who knows. It tastes just fine plain. Perhaps when I make the variation I'll throw some frosting on there.
I give this cupcake a B+
Photography: Travis J. Premo

Tuesday, October 13, 2009

A healthier alternative

Well once again I have been neglecting my little cupcake project, and I apologize. There just doesnt seem to be enough hours in the day anymore. So I decided to make one of the more "interesting" cupcakes, mainly to get it out of the way. Tonight I made gluten-free pecan cupcakes with chopped dates. You can find gluten-free flour at your local health food store. I found this one at Whole Foods. (One of my favorite places to visit) I was pretty interested in making this one. I had some suggestions to make a gluten free cupcake, and wanted to see what it was all about. This cupcake can be found toward the end of the book in the "cupcakes for special diets" section. The cupcake was super easy to make, gluten free flour, sugar, eggs, butter, milk, vanilla, chopped pecans, chopped dates, salt, and baking powder. Bake at 400 degrees for twenty minutes. I think twenty minutes was three minutes too much. They were a little over done. They were also a pain in the you know what to remove from the pan. I used Pam to grease the muffin pan, but maybe some flour in addition to it wouldnt hurt. I dont want to give up on the gluten free aspect of things. I think it can be a really good market....with the right recipe. These however...were no bueno. As my husband said "ugh it tastes like dirt!" That it why there is no picture...I cant even feed these to the homeless or less fortunate. They were so bad. The dates just took over the cupcake. So gross. My next gluten free attempt will be: gluten free macadamia nut and raisin muffins. I'll need to buy soya bran. (What's soya bran?)

Sunday, October 4, 2009

Sorry it's been so long

I cant believe I let five days go by without baking. There just always something on this baker's plate.
Well it's Sunday, so I can use that to my advantage and bake a few in order to catch up.
For the first cupcake of the day, I did one of the variations to one I have already made. I made white chocolate & macadamia nut brioche.
These were much better then the originals, "chocolate chip and raisin". At least my husband thought so.
These seemed a little over cooked, so for my next variation I'll be sure to bake them for less time. Maybe 18 minutes rather then 20.
I did better on the yeast part. I think last time I used to hot of water and killed the poor little guys. The dough seemed to rise perfectly this time around.
Well Cupcakes by Coley will be having its very own Facebook page. Hopefully this will make it easier for people to visit the blog. I'll put a direct link onto the page, along with photos and a contact number and email for anyone looking to place an order. I think this way, if you want to become a fan of my blog or page you don't have to create a yahoo account. So keep your eye out for that. It's coming along nicely.
Photography: Travis J. Premo

Tuesday, September 29, 2009

a deflated mess....

I must say, I'm disappointed with the way these cupcakes turned out.
Tonight I made chocolate hazelnut cupcakes. What could go wrong? Chocolate, good. Hazelnut, good.
I think the authors introduction to this cupcake has something to do with it. He goes on to say "A timeless combination...with very little flour in the mix." I think the "very little flour" part had something to do with my deflated cupcakes, that and it didn't ask for baking powder, which always helps to raise the cupcakes.
The cupcakes has very few ingredients, butter, chocolate chips, sugar, eggs, 1 TABLESPOON of flour....and hazelnuts.
Bake for twenty minutes and according to the picture you're supposed to have this semi-fluffy cupcake, not a deflated mess.
What could I have done wrong? Any suggestions?
Overall taste: pretty good, tasted like a brownie.
Travis' testimonial: "Not a huge fan of the hazelnuts, but the cake is still very good."
Photography: Travis J. Premo

Ice Cream x 2!

Well this will be a pretty short blog, because all I did differently in this blog compared to the last blog was change the ice cream flavor: "Vanilla Ice Cream Cupcakes"
Sorry folks nothing new to the recipe. But be prepared for two more blogs like this one. I have two more variations to make, and all they are is just two more flavors of ice cream. So stay tuned!
(If it helps any, I liked these better compared to the chocolate ones. My hubby liked the chocolate ones better I think. But for more opinions you can ask my mom, dad or brother. They all had some.)
Photography: Travis J. Premo

Monday, September 28, 2009

Ice Cream!

What a good segue from my last cupcake to this one. Tonight I made chocolate ice cream cupcakes. These were a little more involved then your typical cupcake. First you have to make the cupcake part. Which was your standard chocolate cupcake recipe. Once the cupcakes were cooled the book told me one thing, but the picture said another. The book said to cut the cupcakes horizontally, while the picture looked like they were cut vertical right down the center. I had to cut them to put the ice cream in between the two halves, as if I were making an ice cream sandwich....mmmm. For this recipe it called for chocolate ice cream, but the variations call for other flavors. So once that part is done, you have to set them in the freezer while you make the chocolate glaze for the topping. So as you can see it's pretty time consuming. The glaze was a piece of cake. Literally just chocolate chips and heavy cream melted together. When the glaze is cooled off, I used a spoon to lather up the cupcakes. Then I returned it once again to the freezer. The book suggests to take it out of the freezer and into the fridge 30 minutes before serving. So that's what I did. These came out pretty good. The best that I can describe them would be, an ice cream sandwich. They were very yummy in my tummy! Photography: Travis J. Premo

Sunday, September 27, 2009

The kids will love them!

For all you parents out there who are stumped on what kind of dessert you should serve at your son or daughters next birthday party, look no further! These cupcakes are extremely creative and very kid friendly.
This afternoon I made ice cream cone cupcakes. They were very easy to make, minus the frosting. I had some trouble with that, but I'll talk about that in a minute.
To make these cupcakes you'll need flat-bottomed wafer ice cream cones, and a mini muffin pan. The cupcake is just a vanilla cupcake, nothing new. Bake for twenty minutes, and let cool. After they've cooled you'll need to peel away the cupcake liner and place them into the ice cream cone. They actually fit perfectly and they just dropped right in there.
The frosting consisted of confectioners' sugar, sweet butter, a pinch of salt, heavy cream, vanilla extract and to top....colored sprinkles! =)
I was having trouble with the frosting because as I went to pipe it on to the cupcake, the frosting wasn't stiff enough so it wasn't holding its shape. So I went back to square one, and returned the frosting back to the bowl and continued to add sugar until I got the thickness I wanted. The recipe called for 1 1/2 cups of sugar, but in reality I used more like like 3 cups. It still wasn't to my liking, so my husband stuck it in the fridge to set. That seemed to do the trick.
However I didn't have a lot of time after I piped the frosting on the cake before it started to melt and lose the shape. My husband seems to think there's to much cream in the recipe. So in one of my upcoming variations, I'll try reducing the amount.
Both of my parents, and Travis liked the cupcakes. I thought there were really cute. And one day I'll make them for our kids party!
Photography: Travis J. Premo

Friday, September 25, 2009

Makes me miss Hawaii

Has it really been since Tuesday since I last blogged? Blogged? Is that a word?
Anyway lots of stuff has happened over the last week, the reason for my absence.
My husband and I have come up with some great ideas for the future of Cupcakes by Coley. I'll talk more about that towards the end of my blog.
Tonight, I went to the chocolate section of the book and made white chocolate & macadamia nut cupcakes.
These are very yummy.
Vanilla cupcakes with white chocolate chips mixed into the batter, topped with a white chocolate frosting, made with white chocolate chips, milk, and confectioners' sugar. Its a very sweet frosting but good nonetheless.
You kind of have to act quick with the frosting as it turns hard pretty fast. Its resembling more of a solid chocolate now that it solidified. On top of the frosting is when you sprinkle macadamia nuts. Macadamia nuts hold a special place in my husbands and my heart. Hawaii is famous for their mac nuts, and Hawaii is where my husband and I officially met. It's also where my Aunt Vicki and two cousins, Kendra and Ruby live and we miss them terribly. The countdown is on until we can see them hopefully next summer.
Back to cupcakes, as I said before there have been allot of ideas mentioned over the past few days. For one, I got the idea from a co-worker of mine, Candy, who thought it would be a great idea for me to get into the bridal show scene. She said if I get one bride to like my cupcakes, I'm set. And she's right, being a recent bride, I know brides love to spend money and will do anything it takes to get the "WOW" factor at their wedding. Every girl wants something different then the last wedding, something bigger, something better. So I emailed my DJ who played at our wedding, who I found at a bridal show, to pick his brain of what I should do to get ready to be a part of something like that. I'm still waiting on a reply. But I'm thrilled with the idea.
Travis surprised me with buying me a domain name for the Internet. For those less computer savvy, a domain name is an Internet website. Cupcakesbycoley.com is officially taken. It isn't up, but he bought it out so no one else can have it now. Now when we're ready, we'll pay an additional fee and get the website up and running.
In addition to that, my best friends sister asked me what I thought about selling my cupcakes at her families donut shop. They would take a 25% cut, which isn't bad and it would be a great way to get my feet wet in the business world. We haven't worked out all the details and I haven't officially said yes, but I'm thrilled with that idea as well.
I've already emailed my insurance company to see if I can get a quote on a commercial policy. So I can have insurance on my business, and Travis has pulled the paperwork for me to get a permit, and to also get my business name.
To do the business name, I have to first file for a fictitious business name. Once the name gets approved, I then have to get it published. So I'll take it over to a newspaper, get Cupcakes By Coley published and then I can officially say its a business.

Tuesday, September 22, 2009

Number 39 out of 500

My second blog of the night, is another cupcake from the "cupcakes for kids" section of the book.
On page 259 I made the marmalade donut cupcake!
It was surprisingly very tasty! They aren't donuts, don't let the name confuse you. But once you bite into one, you'll see the likeness to it.
The cupcake is your standard vanilla cupcake, my arch enemy!
After baking the cupcakes, you have to hollow out a small hole with a teaspoon and fill it with the marmalade. Now it doest say to, but I decided to put the top back on, once I filled the cupcake with the jelly. Why let the top go to waste?
When that is all said and done, you'll want to make your basic cream cheese frosting, (take notes bear!)-(Bear is a nickname for my very best friend Amanda, of 17 years) Cream cheese frosting is nothing more then cream cheese (duh!), confectioners' sugar, lemon juice, and vanilla extract. You can add more sugar if you need, depending on how sweet or thick you want your frosting to be.
At the end of this little project, I'll be picking 20 of my favorite cupcakes and trying to perfect them. This one may be on the list. So whoever tries one, please tell me you're honest opinion.
I'm excited because my older brother, Ryan, will be home for the next day or so, so he'll finally get to try a Cupcake by Coley!
Photography: Travis J. Premo

Got a little behind....

Sorry for the delay folks. I haven't been up on my blog for a day or so because its been very hectic in the Premo household the past few days. Between trying to catch up on school work and preparing for an exam I had today, and my car (Celly) breaking down, causing my husband and I to buy a NEW car-oh and did I mention my 89 year old grandfather is in the hospital? So a few trips here and there to see him and helping my parents clean out his apartment, it's just been chaotic to say the least. I think I broke into hives the other night, stressed induced I'm sure.
Nonetheless I'm back. These cupcakes I actually made yesterday, but I'm just now having the time to blog about them.
They were another variation. This time to the chocolate brownie cupcakes I had previously made. These were called pecan brownie cupcakes.
They had such great potential until my oven failed on me again. In the middle of baking, my oven decided to turn off. So after the twenty minutes had passed, I took them out of the oven, tore into one, and it was still batter like on the inside. So who really knows how long they actually cooked. I didn't have any other choice but to put them back in the oven. So they are twice baked cupcakes.....
They didn't come out very well. The taste was there, but the texture was ruined due to the baking time. So here's a picture anyway, to show I at least tried. (I'll be trying again soon.)
Photography: Travis J. Premo

Sunday, September 20, 2009

Not exacly a cupcake

Not exactly a cupcake, but it was in the book nonetheless.
I made corn muffins. I could have made another cupcake, but it was closing in on dinner time, and Travis loves corn bread, so while watching the Cowboys vs. the Giants game, we can enjoy some hearty food.
The recipe calls for a lot of butter, Paula Dean would be proud. 1 1/2 sticks of butter, that's about a tablespoon worth of butter, per muffin. At least I used unsalted, that should help a little, right?
After dealing with my horrible oven, and preheating twice they finally got to bake. The book called for them to bake for about twenty minutes, but they just didn't look "done." So I stuck them in for another two minutes or so....much better.
They were on the dry side, I'm not sure if it was because I baked them a little longer or if the recipe just needs more liquid. I think next time I'll use more buttermilk. Maybe add another 1/2 cup to the batter. (Is it still called batter when making a muffin? Or is it called dough??)
Anyway, they tasted pretty good warm and with some butter spread on top. (Not that they need more butter....)
For those interested in the final score....our team lost. The cowboys were up by one until the final four seconds of the game, when a field goal ruined everything. They sure did play terrible tonight, well it wasn't the team per se it was more of Tony Romo, who couldn't seem to throw properly. Its a shame because tonight was their first official game in the new stadium. It would have been great if they won, but whattya gonna do??
Photography: Travis J. Premo

another variation

This evenings cupcake comes from the Madeleine recipe. I wanted to give it another go while the notes were still in my mind of what I wanted to change the next time around.
These chocolate Madeleine's are exactly the same recipe from the other night, with one exception. Which was to substitute 2 tablespoons of flour for two table spoons of dutch process cocoa powder.
This time I DID remember to spray Pam into the pan. They came out much easier this time around. =) I have to say thank you to Travis who helped me spoon them into the shells for me, you're such a good helper!
As far as the taste goes, it was pretty good. I do agree with Travis though in leaving out the lemon zest for the chocolate version.
Other then that, no complaints here!
Photography: Travis J. Premo

Saturday, September 19, 2009

An alternative breakfast

Here's another way to approach a sunny side up egg. These cupcakes are called "eggy cupcakes". They can be found in the cupcakes for kids section of the cookbook.
There wasn't much to the baking process, just you standard vanilla cupcake and vanilla frosting.
The decoration on top is a drained canned peach half. (very creative if you ask me)
My dad thought they would be a cute idea for Easter breakfast =) I agree!
I'm getting a little more luck with the vanilla cupcake issue. I used my moms technique, and filled the empty cupcake cups with water. (since I only made nine of these, I had three that I was able to fill), This made the cupcake a little lighter and a little less dry. (I'm still interested in trying my friends idea of adding the sour cream, I just never seem to have that on hand.)
I did alter the vanilla frosting again though. Vanilla extract. Every pantry should have one.
Travis, enjoyed the texture of the cupcake. He isn't one for canned peaches so he ate that first to get it out of the way. Silly Travy.
Well my Aunt Donna reminded me to get my business cards printed, I agree. It's high up on my to do list. My to do list is pretty high lately.
My parents will be taking some of these cupcakes to my 89 year old grandpa. I'm anxious to hear how he liked them. He's a hard man to please sometimes.
Well stay tuned in, I'm not sure what other cupcakes I'll be making this weekend. I just know there will be a lot.
Photography: Travis J. Premo

Thursday, September 17, 2009

A taste of France

I was very excited to finally make the Madeleine's! My mother in-law, Tammi, who lives in Utah bought and sent me a silicone Madeleine pan. So tonight I put it to the test!
Madeleine's are a traditional cake that come from northeastern France. These date back to the 18th century. They are very small, have a sponge like texture and have a very distinct shell shape to them.
They were VERY easy to make. Although, you have to allow a little extra time for these. Once your done beating the batter, you have to let it sit in the fridge for about twenty minutes.
Now, this was my very first time making them so I wasn't sure on the measurements for the cups or how they were going to turn out. I filled my shell shaped cups about 2/3 of the way full. I did spread the batter evenly across the cup, to get the batter into all the nooks.
Twenty minutes later, I took them out of the oven. They didn't look to bad, some were more puffy then others but that's okay. You live and they learn as you say. Speaking of learning....next time I should remember to grease the pan...it might help a little. Even though the pan is silicone, I intended to spray a little of my mom into it. (Pam cooking spray. My mom's name is Pam...it's a running joke in my family. When growing up I used to help my mom out a lot in the kitchen, and she always had me reach for the next ingredient. So when it was time for the cooking spray she would always ask, "can you hand me, ME?") So when I took the Madeleine's out, the bottom or should I say the top, didn't turn out so "shell like" They had lost a lot of their decoration.
This recipe in particular called for a glaze. The recipe uses way to much of each ingredient. Anyone making this can easily cut the glaze down to a quarter of the recipe. I had plenty to spare. What a waste. The glaze was just sifted confectioners' sugar, orange zest, a pinch of salt, and softened sweet butter.
These came out pretty tasty I must admit. My husband said, "that's a pretty good cake ya got there!"
So I really do want to give these a second go. I think after I remember to spray cooking oil, and use a little less batter in each cup, I'll have a pretty good thing on my hands. The book has a chocolate Madeleine recipe. So that should be pretty yummy.
Photography: Travis J. Premo

Wednesday, September 16, 2009

A scaled down version

Tonight, I bring you a "classic cake scaled down to a cupcake!"
Pineapple upside-down cupcakes.
In general the instructions for this one, was a little confusing. I had to call some backup into the kitchen, my husband, and a phone call to my mom did the trick!
This recipe doesn't use liners, which is nice. I don't have to use what little liners I have left remaining. Instead you grease a muffin pan with butter, and dust with a little flour, tapping off any excess.
The name says it all "upside-down". You create these from the bottom up. This was the confusing part of the book. For the topping it asked for 1/2 cup (1 stick) of sweet butter. But then in the instruction part of the recipe, it says drizzle 1 tablespoon of melted butter into each cup. Now, there are twelve cups to a pan, and 8 tablespoons to a stick of butter, sooooo where do the other 4 tablespoons come from? I sure as heck wasn't about to waste twelve tablespoons of butter. So after taking some advice, I just divided up the stick of butter equally among the twelve cups.
I'll just come right out and say it, what a pain in the you know what to get them out of the pan! What a mess, I'm pretty sure I greased them well enough, but the darn things fell apart the moment I took them out of the pan. The pineapple and brown sugar mixture, made a glue like substance or something,and bonded to the pan. I'll do what I can to make the picture look pretty.
The taste is REALLY good, now I just have to perfect the method of the pan. More butter to grease? Less brown sugar? I don't know, any opinions out there are always welcomed.
My husband loves them, so Ive got to find the problem to my pan issue.
Well my statistics homework is calling my name, and then my bed time is soon approaching.
Photography: Travis J. Premo

Tuesday, September 15, 2009

One of Travis' favorites!

You really cant go wrong with adding crushed Oreo's into a cupcake. This next cupcake is one of my husbands favorite. So when I told him I was making it again, you can understand how excited he got.
Tonight I made cookies & cream cupcakes. Now for those who know me, you'll know Ive made these already, before I set this challenge up for myself. So lucky for me I already had notes to look back on.
The cupcake recipe was rather simple, just add five crushed Oreo's to the mix. (The cake was a vanilla cupcake recipe)
For the frosting, it was a butter cream frosting. Confectioners' sugar, sweet butter, a pinch of salt and I added something of my own because it simply needed it. Vanilla extract. The flavor just wasn't working for me or Travis. Now its perfect! I also added about 1/2 more of the sugar then what it asked for.
As far as my notes on the baking process: I usually use an ice cream scooper to scoop out the batter. So for each liner I only did 1 1/2 scoops. The last time I made these I did two, and the batter got way to big in the oven.
You will also need to double the frosting recipe if you want to frost all of them. The picture in the book has this mound of frosting, which you'll never get if you stick to the regular measurements.
I must admit I had a helper in the kitchen tonight, my husband who loves me very much washed out a cupcake pan for me, and helped me mix the frosting. I use an electric hand mixer to mix up all my frosting's and my arm was starting to give out on me. So like a damsel in distress, he came to my rescue.
As far as cooking time, it says to cook for twenty minutes. I already took it out thirty seconds early, not that that makes much of a difference but I suggest maybe 18 minutes.
The taste was great just like the last time. There will be a third time to making these.
Travis gave me a good idea earlier this week. I think I'm going to start giving left over cupcakes to the homeless. I throw away to many cupcakes, and I feel bad wasting all that food when I know there are people out there who have no food at all. So I'll be doing some research to find a homeless shelter near my house. Or maybe a soup kitchen. Something along those lines.
For those interested, I have 468 more cupcakes to accomplish by August 2010
A hint for tomorrow: Pineapple.
Photography: Travis J. Premo

Sunday, September 13, 2009

A good way to start the day.

For my final cupcake of the night, it isn't really a cupcake per say but I chose to do chocolate chip & raisin brioches.
Ive never made brioche, so it was a learning experience for me.
This one you WILL need plenty of time to prepare for them.
In this recipe it calls for active dry yeast, which can be found in the baking aisle at the super market. Dry yeast needs warm water to activate. Make sure it isn't too hot, because you don't want to kill the little guys. (if too hot of water is used, your dough wont rise properly.) I may have done this, because it didn't quite double in size like I wanted to, still I got the amount of muffins I wanted out of the dough. The dough will need about 45 minutes to rise. Mine was more like an hour, it just depends on how warm it is in your house. So this was a good stopping point to have dinner, yum!
After that was finally done I was able to add the raisins, (I'm beginning to think the author likes raisins....) and the chocolate chips. Once that is done you have to let it rise AGAIN for another twenty minutes. Then you brush a little beaten egg on top of each brioche and your set to put it in the oven. So here it is 9:30 at night and my brioche was just put in the oven. I wish I had done this earlier.
20 minutes later.....
brioche is done! Hmm I may suggest either lowering the temperature down a bit. 400 degrees may be too hot OR bake them for 1-2 minutes less. They came out a little burnt. Burnt may be to harsh of a word, but they are definitely darker on the bottom then they should be.
As far as the taste, it was pretty good! Id make it without raisins next time for Travy. I had them cold, but I have a feeling they'd be much better warm, first thing in the morning and not cold at 10pm.
Well, I'm off to to my exciting world of homework.
Photography: Travis J. Premo

Number 29 and 30!

My second and third cupcakes for the day comes from page 236 in my cook book. Mini peanut butter cupcakes, and it's variation mini marshmallow & peanut butter cupcakes. These you have to make in advance because they have to sit in the fridge for two hours. I recommend longer, the peanut butter wasn't as solid as I would have liked it to be. The heading for these were "simple and no fuss". I beg to defer it was pretty messy if you ask me. To make these you'll need milk chocolate, sweet butter, heavy cream, and smooth peanut butter. Then the book goes on to say, with damp hands shape the peanut butter into 12 small flat circles, and push the peanut butter into the bottom of the cups. This wasn't as easy as it seemed. It was messy and gross, and I ended up using a spoon to place the peanut butter in the cups. You'll need to use a double boiler again to melt the chocolate. Once that's done you can pour the chocolate over the peanut butter, and place it in the fridge. These were very sweet, but very good. When eating them, it made one of my eyes squint due to the sweetness factor. You could go into a sugar coma if you aren't careful. Luckily there small. A very good snack nonetheless. Photography: Travis J. Premo

A hearty flavor

Well it's Sunday, and you all know what that means. Time to crank out a bunch of cupcakes to reach my 500 cupcakes.
For the first one of the day, I went to page 71 of the cookbook: spiced sour cream cupcakes.
The author of the book suggests having these cupcakes during a tailgate party or perhaps a fall picnic.
Inside the cupcake there's cinnamon, allspice, nutmeg, sour cream, brown sugar, pecans and raisins.
They smelled so good after baking in the oven for twenty minutes.
The cupcakes themselves have no butter in the recipe so the cupcake kind of stuck to the wrapper.
Travis' testimonial: "Good texture, good frosting!"
The frosting is your basic cream cheese frosting with orange juice, and orange zest added to the mixture.
Photography: Travis J. Premo

Saturday, September 12, 2009

Chocolate Chip & Banana Cupcakes

Well I finally got around to making cupcakes, my mom graciously let me borrow some supplies to finish making the batter. Its a little hard to make a cupcake with just one egg. Nonetheless, here is a chocolate chip and banana cupcake! This is one of the three banana cupcake variations. Same recipe as the first, with 1/2 cup of chocolate chips added to the batter. Travis' testimonial: "You made an already good cupcake even better." These actually came out very moist, so I was pretty pleased with that. There were two different variables that went in to it. One being I used a better oven, my parents', and two my mom told me to add water to the unused portion of the cupcake pan. Whatever it was, it seemed to do the trick. (mental note for the vanilla cupcakes) Many of you might be wondering, who the cutie is in the picture. That's my teddy bear, Boo. Travis and I got her together a few years ago at build a bear. She's all ready for bed, and so am I. Photography: Travis J. Premo

Thursday, September 10, 2009

Number 26!

OK so TONIGHT I finally made those "Choc-fudge-frosted cupcakes" (that certainly is a mouth full)
I must have read the title wrong at first because I thought they were chocolate cupcakes, again, with chocolate fudge frosting. But alas, they turned out to be vanilla cupcakes with a fudge topping.
For starters this recipe is supposed to make 1 1/2 dozen cupcakes. Now I always cut my recipes in half, but I didn't get enough out of the batter. I barely squeezed by my nine, and even that was pushing it. The last three or so, were undersized. So keep that in mind if you try to make these yourself.
The fudge topping was a little hard to work with. Ive said it before in my blogs, in my opinion you always need to use a double boiler when melting chocolate. Some recipes in this book call for it, others don't. This one did not. It said to use a saucepan, which I did. But whenever you remove the chocolate from the heat, it becomes either lumpy, burnt or crumbly. That's the beautiful thing about a double boiler, the chocolate isn't directly on the flame.
So with that being said, it was hard to spoon the frosting on the cupcake. It was actually easier to use my hands.
Travis testimonial: "Pretty good, I like the texture of the cake."
My testimonial: "Can I have some milk?"
But overall I give this cupcake a B+
Photography: Travis J. Premo

Wednesday, September 9, 2009

no eggs, and soda?

I know I said I would make a chocolate fudge cupcake tonight, but I wanted to try something else first, that caught my eye.
This will be my second cupcake from the "cupcakes for special diets" section of the cookbook.
Tonight I made a egg-free chocolate cupcake. It actually wasn't too bad. My husband and I would much rather have more fatty stuff in it. =) But for those who are on strict diets, or who cant eat eggs, this is a pretty good substitution.
The cupcake is actually pretty simple to make. It calls for the basics, butter, flour, vanilla and baking powder. Then in addition it, calls for milk, dutch process cocoa powder, chocolate chips, and then the kicker, 1 1/2 cups of cherry cola.
Travis' testimonial: "Good, but needs more fat!" he's a sweets kind of guy. But he actually did like it. It was a little dry, needed more moisture for my taste. But with no eggs, that can become a problem.
You couldn't really taste the cherry cola, it just added a little sweetness to the cupcake. Without it, it would have been pretty bland. But for those who don't like that artificial cherry flavor, don't worry-you cant taste it.
I'll be bringing these over to my parents in the morning, so in tomorrow's blog I'll write about their testimonials, so you all have another opinion about it.
Photography: Travis J. Premo

Tuesday, September 8, 2009

Diets beware!

Mmmmm all you dieters out there, I'm sorry to inform you that this will just about kill any diet out there.
Tonight I made a Devils Food Cupcake, and it was yummy!
It wasn't a beginners cupcake that's for sure. It was very time consuming, and required your full attention. For starters I had to sift the self rising flour, and baking powder together, that's always a messy task. No matter how hard you try, you will always end up with flour dust on your counter.
After the sifting was done, I had to melt the chocolate in a double boiler, followed by separating eggs. Separating eggs isn't difficult, you just have to be careful.
After you mix the egg yolk into the batter, it asks you to beat the egg whites until soft peaks form, then you gently fold them into the batter. Forming soft peaks is always a little time consuming. I always start to wonder "am i doing this right?" because it takes a few minutes. Eventually, the egg whites will turn into a foamy mixture, which is what you want.
After baking for twenty minutes, the cupcakes will come out a medium brown color, and soft to the touch.
The frosting is one of the best yet in this cookbook. It was very simple: butter, milk, chocolate, vanilla extract and confectioners' sugar. Just the basics, nothing fancy like lemon juice for a change!
I fed my husband the frosting, and he loved it! It was so good to see him like a cupcake after that avocado and lemon disaster!
Well I think I'll stick with the chocolate theme, and make a choc-fudge-frosting cupcake tomorrow.
Photography: Travis J. Premo

Monday, September 7, 2009

Could be better...

For my second recipe of the night, I chose to make an Avocado & Lemon Muffin. You can find this recipe under the "cupcakes for special diets" section of the cookbook. I'm a little confused as to why a muffin is even in this book. But I'm going with the flow either way.
As Fergal Connolly said, "Avocados contain a host of essential oils, vitamins, and minerals - all beneficial for the body's nervous system." That's great and all, but I'm not sure they belong in this muffin.
I was super excited to try this recipe, it has all great ingredients. Avocados, lemon juice, extra virgin olive oil, lemon zest, and ground black pepper. Unfortunately they just didn't mesh very well.
It was a very bland tasting muffin. I really want to give this a second shot, and put my own spin on it. I think it has really great potential. My husband gave me the idea of perhaps melting some cheese on top.
I think the recipe also calls for too much flour, because that's the first thing my taste buds tasted. So next time, I might sift the flour and put a little less. The recipe calls for 2 1/2 cups.
We shall see what happens.
Photography: Travis J. Premo

Banana Pots

Well this picture may look a little familiar to you all, that's because back in August I had made gingerbread pots. Now its time for one of it's variations, which is the banana pot.
All the banana pot variation is, you add one mashed banana into the egg mixture.
I did make one alteration on my own though, and that was to leave out the chopped candied ginger. Something told me the combination with banana wouldn't be so yummy. I could be wrong though so don't be afraid to try it.
Looking back on my notes I remembered the drizzle for this recipe was extraordinarily sweet, so I cut it in half. The five tablespoons of lemon juice combined with 1 cup confectioners' sugar is to send anyone into a sugar coma, that's for sure.
Travis' testimonial: "Not bad, interesting."
I would suggest baking them for about 1-2 minutes longer. I think by adding in the banana, it added an extra moistness and needs to be cooked. It came out a little gooey.
Other then that, it was a pretty good run.
Photography: Travis J. Premo

Sunday, September 6, 2009

Vanilla cupcake variation

So many different variations. This next batch is one of the three vanilla cupcake variations.
All I did differently to the recipe was add about 1/4 cup of golden raisins.
As far as my troubles with the dryness of the vanilla cupcake recipe. Ive gotten alot of great ideas, such as adding sour cream to the mix or cooking it for 2 minutes more at 50 degrees less.
I didn't have any sour cream on hand, so I'll save that for next time. But I took the advice of Travis' mom who used to bake her cookies this way. Instead of baking them at 350, I reduced the heat to 300 degrees and baked them for 22 minutes, rather then 20. This seemed to work pretty well, much better and a big improvement. The top of the cake was a little dry, but I think that's because I just left them out a little longer then I should have. With a few more adjustments I should get the recipe just right!
Photography: Travis J. Premo

My 20th cupcake

What other way to celebrate my 20th cupcake then making one with chocolate in it?
This morning I have made a chocolate mud cupcake.
I'll start off by saying I WILL make these again, just with a few adjustments.
The cupcake was rather simple to make. Chocolate chips, butter, eggs, sugar and flour. Then to top it off, some dutch process cocoa powder for dusting.
The cupcake was very light, and pretty much melted in your mouth. Very delicious, you will want a glass of milk afterwards.
I will however reduce the cooking time by a minute or two next time. The cookbook said to bake for twenty minutes. I think that might be pushing it. I'll try 18 minutes, and then leaving them in the pan for a little longer to cool.
If anyone is in the neighborhood, please feel free to drop by to pick up cupcakes. I'm building up quite a collection here.
Photography: Travis J. Premo

Just another variation

This entry, sadly will not have a photo attached to it. There isnt a difference between this cupcake, and the rose cupcake I made yesterday. This cupcake is called "Frosted Flower Cupcake." The only difference between the two was that I brushed the rose petal with egg whites, and sprinkled them with granulated sugar and set aside to dry. This didnt turn out so pretty. One thing was even sitting over night they didnt dry. And the frosted look didnt come out at all. It just made it a sticky mess. There was no way the camera would have picked it up enough for me to post it on the blog. Just know I attempted it, and it failed.

Saturday, September 5, 2009

My 18th Cupcake

For my next cupcake I've made a banana & honey cupcake. Sounds pretty good to me!
I like this recipe because for a change of pace, instead of sweet butter it calls for margarine. Now if I'm out of butter one day I can just make one of the three variations of this recipe.
This cupcake calls for, bananas, brown sugar, honey, and roughly chopped walnuts. The walnuts offset the sweetness and "gives it a little crunch."
I was once again having some difficulties with my oven, so about 5 minutes into the baking session I had to take the cupcakes out of the oven, and wait for it to get back up to temperature. Because of this, I don't think they came out as golden brown as they should have. They still spent the twenty minutes in the oven like they were supposed to. But they don't look exactly like the picture.
Another thing that isn't exactly to the book is, Fergal Connolly (the author) wanted me to place each cupcake in a foil cup to display. Well I didn't have foil liners, so regular ones had to do.
These cupcakes can be stored for up to two days in an airtight container, or you can freeze them for up to three months.
Now for the fun part, my job as the taste tester!
Holy cow these are delicious. Could be one of the best yet. "Tastes like a warm delicious banana bread" Travis Premo said.
I really want my best friend, Amanda to try these. She's a sucker for banana. Unfortunately we live about 25 miles from one another.
Another plus, they are low-fat!
I give this cupcake an A+
Photography: Travis J. Premo

Rose Cupcakes

Well, I wont have to much to post on this blog. This is the same exact cupcake as my previous post, "Pretty in Pink" with the exception of the flower petal.

My cookbook has variations of each cupcake, that's why there are 500 cupcakes. So for this cupcake, the variation recipe was to substitute the carnation petal, for a rose petal. That's it. No changes to the recipe what so ever.

A little lame I know. But I still wanted to commit to the 500 cupcakes.

So there you have it.

Photography: Travis J. Premo

Pretty in Pink

Let me start off by saying, I hope everyone is having a nice three day weekend to celebrate Labor day. Labor day weekend always makes me a little sad because it means summer is coming to an end, and a brutal semester of school is in front of me.
This afternoon I made carnation cupcakes. There isn't a whole lot to this cupcake, its just your typical vanilla cupcake. Which by the way I'm still struggling with these. Ive made this same recipe a couple times now, and the darn things just wont stay moist. They dry very quickly. Its got to be the recipe at this point. Travis even went out and bought me an oven thermometer to make sure our oven was correct, so I know it isn't heat related.
The frosting, was interesting. All it was, was confectioners' sugar and lemon juice. So this made the frosting very stiff and hard to work with. The taste wasn't all that great, it was very tart. My husband didn't care for it at all. I wasn't able to spoon the frosting on with a spatula or a spoon, I had to use my fingers, and yes they were clean, to sorta roll it on to the cupcake. It took on sort of a putty like texture or better yet a cream or an ointment texture...weird I know.
Well were off to the store to buy more supplies.
Photography: Travis J. Premo

Thursday, September 3, 2009

A little more time consuming of a cupcake....

Tonight I made a cupcake that had originally started out in the south as hummingbird cake. But instead, with the help the author of "500 cupcakes" I turned it into a cupcake topped with marmalade frosting.
Let me just say, this isn't a cupcake you want to try if you're in a hurry. It was more time consuming then the rest. It had a lot of ingredients that you had to prepare ahead of time.
In the cupcake you have mashed bananas, orange zest, shredded carrots, crushed pineapple, and flaked coconut.
I didn't follow the recipe exactly tonight. I'm a little bummed about it, but at the same time I didn't want to spend $6 on something I only needed a 1/4 cup of. The original recipe called for safflower oil, which is another type of cooking oil that comes from a flower. I especially didn't want to buy this because not only is it colorless, so it wont have an effect on the color of my cupcakes but its also tasteless as well. Instead of the safflower oil I used the corn oil which I had already in my pantry. It didn't seem to change the taste of the cupcake, although I guess I wouldn't really know since Ive never made them and I don't have anything to compare it too.
The frosting, was good. I recommend using more confectioners' sugar then what it asks for. I just used what it called for and it was very runny. Not what the picture in the book portrays at all. In the cookbook it shows the frosting pretty thick and stiff.
Now for the good part: the taste!
My husbands testimonial: "Its good, interesting texture."
The cupcake was really good, very sweet though. It kind of made my left eye close at first, because it was to intense for me. It was one of those cupcakes where it was good, but I'm not sure if I'd make it again. (Maybe a second time, to work out the kinks)
Well I'm not sure what cupcake I'm making tomorrow. I'm still going out of order a little bit. I went to one store today and didn't have the right ingredients for the next one in line. So I just found a recipe that I could get all ingredients in a one stop shop. After work and school, I was too exhausted and lazy to go to multiple stores. So I apologize for bouncing around the cookbook a bit.
It's off to bed for me. Night, night!
Photography: Travis J. Premo.

Wednesday, September 2, 2009

For the chocoholics!

Well tonight I had to go a little out of order from the cookbook. I was scheduled to make Madeleine's but I don't have a Madeleine pan to make them in, yet. My mother-in law, Tammi who lives in Utah, said she'd order one for me and have it shipped. =) Thank you again mama! I cant wait.
So instead of the Madeleine's, I've made Chocolate Brownie Cupcakes. These in particular are meant to be served warm from the oven. (The only way to eat a brownie in my opinion!)
For the cupcake you'll need to use a double boiler in order to melt semisweet chocolate and sweet butter together. After the mixture is melted you can go ahead and add it to the flour, sugar, and egg mixture.
After baking the cupcakes for 25 minutes, and letting them cool, I came back to them some what deflated. I was kind of bummed about this, they were so pretty straight from the oven and five minutes later they had lost their shape. They aren't too bad, the dollop of vanilla cream will cover them up just fine! (No one will ever know-muahaha!)
The vanilla cream tastes pretty good. The cookbook asks to beat the heavy cream until it becomes "semi-stiff", and I couldn't get mine to become that at all. So maybe someone out there has some suggestions?
When eating the cupcakes I found it hard to remove it from the wrapper and when I finally did remove it, it kinda crumbled in my hand, VERY delicious however.
Here is a testimonial for you all: Mason Premo- "Good stuff Yo!"
Here's a little info. I did not serve the cupcakes right from the oven as suggested. Instead I waited until dinner was over with and put them in the microwave for twenty seconds. They came back to their chocolate gooey selves again. mmmm!
I will for sure make these again.
Photography: Travis J. Premo

Tuesday, September 1, 2009

One of my favorite flavors.....

If anyone out there is like me, and loves banana, you're gonna love this recipe.
Tonight I made a banana cupcake with a cream cheese frosting with sliced banana's on top.
For this cupcake you'll need sweet butter, superfine sugar, self-rising flour, eggs, nutmeg and mashed riped bananas.
Nutmeg is a spice grown mainly in Indonesia, and has a sweet pungent taste to it. When most people think of nutmeg, they think eggnog which is a key ingredient in the holiday drink.
After baking for twenty minutes at 350 degrees, the cupcakes came out light and fluffy, with the perfect round top I love!
The frosting is a cream cheese frosting, made with cream cheese (of course!), confectioners' sugar, vanilla extract, and lemon juice.
Top with a thin slice of banana, and there you have it!
They really do taste pretty awesome if I do say so myself. I'm a little uncertain about the cream cheese frosting, I'm afraid the general public may find it too tart for this particular cupcake. Still tasted awesome though.
Photographer: Travis J. Premo